Tuesday, April 23, 2013

Lecture 2 With Paul..Artlantis Rendering Practice.


Paul Mitchell lesson: PDF2  4/12/2012
Open the demo model on google sketchup,  and make shadows from view toolbars and then Shadows.
Add a scene from view animation, a series of scenes from the shadows. 
Position the shadows
Add shadow gaps. 
Select or highlight objects and then move them upwards to 5 mm, so the shadows can be made.    As thw picture below shows, there is a slight gap under the objects.  
Just keep adding scenes and adjusting the shadows in different directions and views. 
After you finish the scenes, you save the model as sketchup model on desktop. 
We want to start artlantis studio. 
ARTLANTIS

 
Open artlantis studio 4
 
next to the camera button you just press the list button and youll see all the scnes you’ve made. 
The navigation tool which you can get from the top menu bar, is it a square that has y and x axis. 
 
after you adjust the lighting in the scene and add a material surface, you just go to the rendering button on the top menu bar which is a square with a small camera at the right bottom corner
After this, you click on options and then a small box would come up, change everything to 2700 size, and however you want it to be, tick the anti-aliacing to high.


this is the outcome of the rendering as you can see this is what it will look like.
To add lighting, you need to turn off the lights and shadows in the sun button, and then press the light bulb for lighting.  After that, right click on the light word on the right and press activate current layer.  Add with the + sign and then open the navigator to control where you want to get the light into the building.  Also turn the time off bar in the sun.
 
button menu. 
Don’t forget before you do anything tick off the gradient put heliodon sky.  


The technical tutorials of my University Lecturer, Paul.


Paul Mitchell Lesson: Tuesday.
Photoshop skill techniques:
·      Using masks and sketches to render into nice visual image, ready to present.

d
         First thing we do is save it as sketch 1 photoshop, and then we crop it.  Rotate it from the crop tool make sure you make it a square.

Unlock the layer by double clicking the background layer, to make it a layer 0.  Make a copy by dragging it to the bottom at the “new layer “button. 
make another layer with curves and levels. 
 
Curves: ctrl + M
Levels: ctrl + L
you play around the layer tool, make them all in in the middle, to bring the black and white only. 
Then turn off all the layers and make the curve layer on, press ctrl + M to bring the curve tool in.

Click the eye dropper on the right, and then click on the white backgrounds.
After that, make another copy of the layer you are working on, then turn off all layers except this one, go to Select -> colour range, and then press delete.  You can however, play with the fuzziness to make the image look whiter and black bolder.  
this will come out after you hit the delete button after you have selected the colour range.
Make the outline of the lines with the polygon tool to select it
You click on the paint bucket tool and select a colour of your choice, then drop it in the selection.
While it is selected, and it is coloured, bring in the gradient tool and just mess around with it inside the selected area, to bring the best gradient you like. 


Creative Direction Infographic!

Greetings!
It has been a long time since I've updated my blog, and now I am back with more information about me, and my career path or the design path.  

I have recently been planning on my future plans, ( although will try to stick to them) just a clear plan about what I will be doing in the next few years time.. 

I drew a quick illustration on photoshop, just a very simple infograph about the type of design I am into, and the direction I'll be going to as well...


Saturday, January 26, 2013

The Update of the SWOT Analysis

If you are wondering that is the SWOT, then it is just a circle of questions and some statements that relates to my field of study, Interior Design, the circle rotates the questions as well the rating around each of those questions.

I keep updating this SWOT analysis, everytime I have learnt something new or have updated my skills and knowledge.  Those questions also motivate me to learn more and research more, as my tutor always said that research will never ever stop, just have to keep looking for new stuff, inspiration, innovations and information updates. 


Friday, January 25, 2013

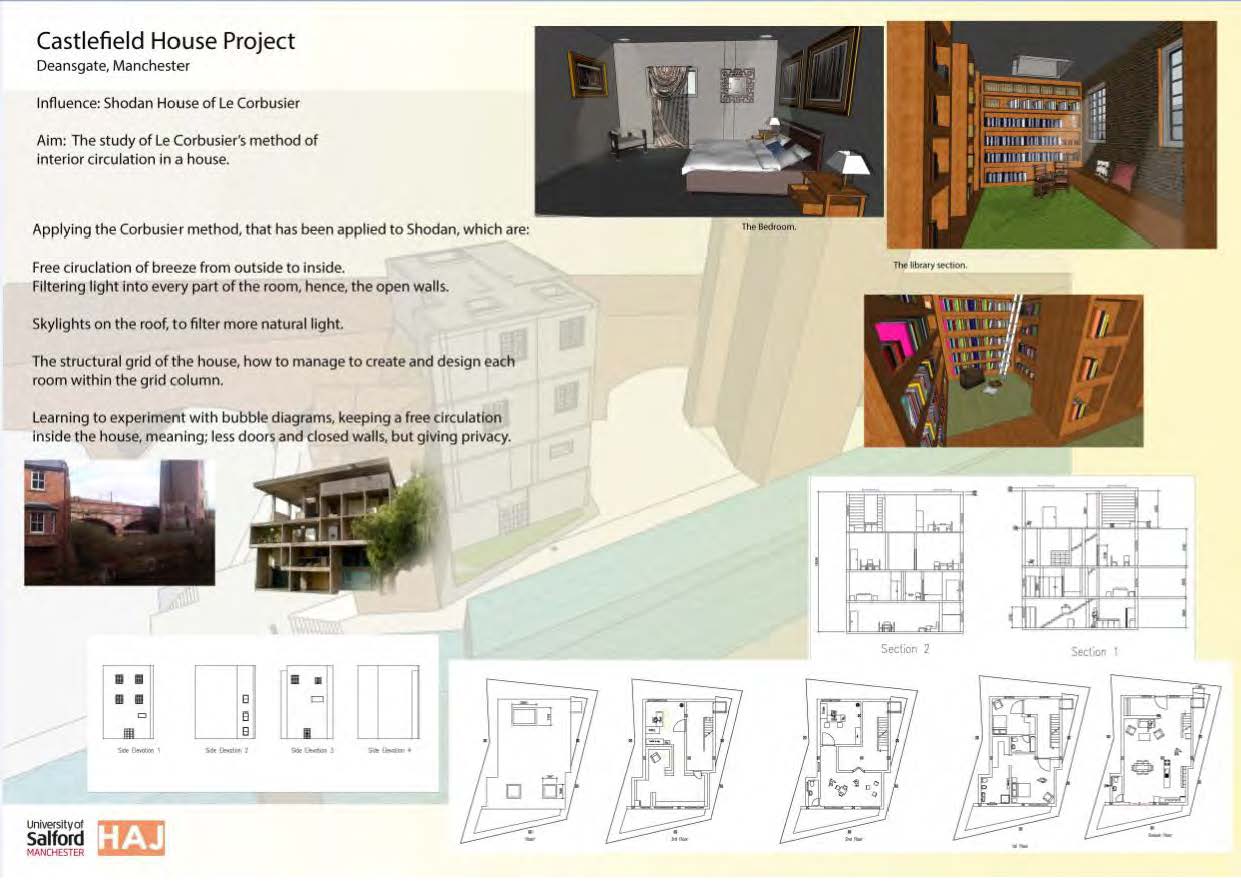
Reviewing a completed project: last year's house project

I have completely renovated last years client presentation board of the house project, based on my new skills and advanced knowledge in photoshop, and google sketchup, unlike the previous year, I was learning the programs (fresh starter) so I was not good at decorating and make the structure of the house fixed as a group or component, I did not even know the difference between them.

What annoyed me though about renewing this project, I could not change the windows,doors, and make it even more spacious, (free circulation as Le Corb. described), because if I did so, I would change the whole architecture of the house, which I can do but dont have the time! 
I Love the library/reading room, my favorite part of the house, I love reading books and being isolated by towers of books...

However, I enjoyed renovating and redecorating those rooms, because I am more confident with programs, I am applying my skills and experiences, which is very important, one should always keep learning and never stop learning, to also improve their work, trying harder and better next time.  Which you will get things better.


Wednesday, November 7, 2012

Entrepreneurial Assets Profile Scoring


My personal scores or rating on myself, towards the social, and design community.